Creating and Editing Meters
General Overview
This chapter describes how to create a new meter, edit an existing one, and configure its properties.
Creating a New Meter
Procedure
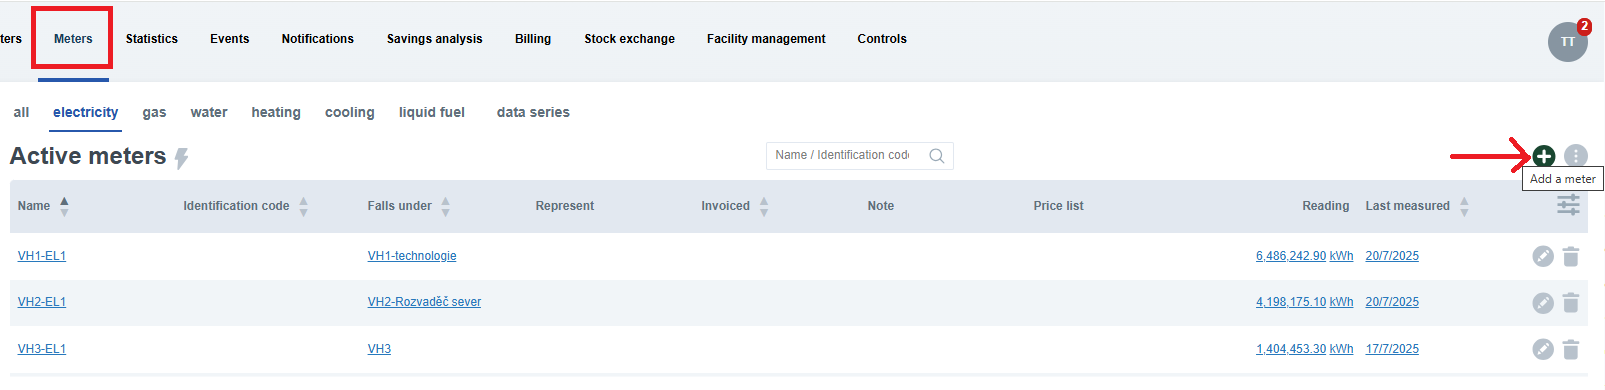
- Go to the Meters tab.
- Use the Add Meter button.
Example from the application interface:
Meter Information
| Field | Description |
|---|---|
| Name | Any name to help identify the meter. |
| External ID | Registration number from another system. |
| Meter belongs to | Entity the meter belongs to. |
| Commissioning date | Date the meter was installed and commissioned. |
| Calibration expires on | Date until the calibration is valid. |
| Identification code | Internal identification or serial number. |
| Brand meter type | Manufacturer and model as stated on the label. |
| Registration code | Supply point EAN code or other identifier if applicable. |
| Number of digits | Number of digits on the physical display. |
Type of Meter and Type of Measurement
| Setting | Description |
|---|---|
| Consumption | Records energy consumption. |
| Production | Records energy production. |
| Readings | Manual or automatic readings. |
| Profiles | Detailed interval data. |
| Note: After saving the meter, you cannot change the type from consumption to production or vice versa. Likewise, switching between Readings and Profiles is not possible. |
|---|
Statistical role of the Meter
You can configure whether the meter is included in statistics.
| Option | Description |
|---|---|
| Measures total consumption: [entity] | Only one meter per entity can be marked this way. |
| Meter will not be included in statistics | Will not be included in statistics or reports. |
Additional options depend on the type of meter (electricity, water, heating, etc.) and whether it is
a consumption or production meter.
If a specific purpose is assigned to the meter, statistics can display, for example, electricity consumption for ventilation, water consumption for domestic hot water (DHW), or heat consumption for heating hot water.
Example from the application – heating meter settings:

Table: Overview of Options by Medium
| Option | electricity | gas | water | heating | cooling | HCA | liquid fuel | production |
|---|---|---|---|---|---|---|---|---|
| Not included in statistics | ✔️ | ✔️ | ✔️ | ✔️ | ✔️ | ✔️ | ✔️ | ✔️ |
| Measures total consumption | ✔️ | ✔️ | ✔️ | ✔️ | ✔️ | ✔️ | ✔️ | |
| Electricity for ventilation | ✔️ | |||||||
| Electricity for cooling | ✔️ | |||||||
| Domestic hot water | ✔️ | |||||||
| Rainwater recovery | ✔️ | |||||||
| For air-conditioning | ✔️ | |||||||
| Heating hot water | ✔️ | |||||||
| For ventilation | ✔️ |
Data Transformation and Unit
Used for setting coefficients and offsets when recalculating data:
| Field | Description |
|---|---|
| Coefficient | Conversion to another unit. |
| Offset | Correction of measured values. |
| Unit | Final unit (kWh, m³, etc.). |
The conversion coefficient is used to adjust data entered manually, for example, by a technician during on-site meter readings.
| Example: If a new meter with automatic readings is installed in a building and, after creating the meter in Enectiva and configuring the data import, it is found that the imported data is 1,000 times higher than the actual values on the meter, the conversion coefficient should be set to 0.001. This ensures that the consumption displayed in Enectiva corresponds to the actual consumption. |
|---|
Example from the application – Data Transformation and Unit Settings

Import data source
This section is used to configure whether data from the meter will be imported automatically into Enectiva from an external source.
If the meter does not have automatic data import, leave the option “no automatic import” selected.
Example from the application – No Automatic Import
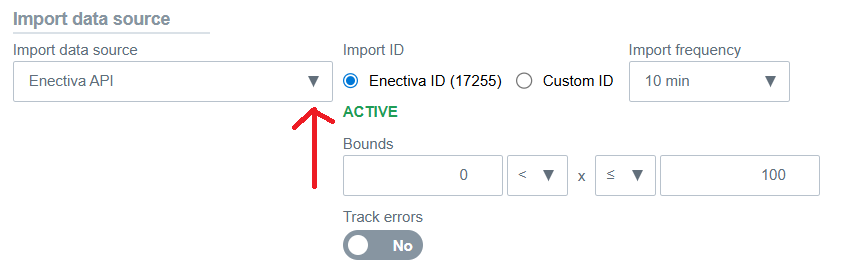
 If the meter is connected to automatic data import, select the appropriate data source and verify the Import ID
settings.
If the meter is connected to automatic data import, select the appropriate data source and verify the Import ID
settings.
Automatic Import Settings
| Setting | Description |
|---|---|
| Import ID | Identification for automatic data import. |
| Import Frequency | Interval (e.g., every 10 minutes). |
| Bounds | Values outside the specified range are ignored. |
Setting Value Bounds for Automatic Imports
When creating or editing a meter or a data series with automatic data import, it is possible to set value bounds for the imported data.
For each meter with automatic import, lower and/or upper bounds can be defined.
Values outside these bounds will not be imported and will be recorded as rejected imports.
Examples of setting value bounds:
| 0 < x | Values must be positive. |
|---|---|
| x ≤ 100 | Values must be less than or equal to 100. |
| 0 < x ≤ 100 | Values must be positive and less than or equal to 100 (e.g., relative humidity). |
Other
Additional details, such as notes or the address / GPS location, can be added to the meter.
Price and Consumption
You can specify whether the consumption meter is invoiced.
Marking a meter as invoiced ensures that its values are used for cost calculation in the Billing section.
Procedure
- When creating a meter, set Yes in the Price and Consumption section.
Example from the application

- Or later via the Pricing & invoicing tab using Mark as invoiced.
After creating or editing the meter, make sure to save the changes using the Save or Update meter button.